Saturday, September 25, 2010

Art Appreciation Part 1

Assignment

Step 1: Above are 20 images, I want you to rank them in order by their letter starting with number one being your favorite. You might want to click on the image for better detail. Please post your responses in the comment section.

Step 2: What were your top three images and what where you bottom three?
(Example: Top 3: A, H, and M Bottom 3: B,Q, and L)

Step 3: Answer the following questions about each of your TOP three favorite images. (Your responses must be in complete sentences)
a) Why did this image appeal to you?
b) What do you think the image is about?
c) What do you think the artist is trying to communicate with her/his artwork?
d) Would you have this artwork in your home, why or why not?

Step 4: Answer the following questions about each of your BOTTOM three least favorite images. (Your answers must be in complete sentences)
a) Why didn't you like the image?
b) What do you think the images is about?
c) What do you think the artist is trying to communicate with her/his artwork?

PLEASE POST YOUR RESPONSES IN THE COMMENTS SECTION AT THE END OF THIS POSTING AND SIGN YOUR NAME FOR CREDIT

e-mail me if you have any questions: bmedina@schutzschool.org.eg

A

B

C

D

E

F

G

H

I

J

K

L

M

N

O

P

Q

R

S

T

Wednesday, September 22, 2010

2-Point Perspective Pen and Ink

Assignment-2 Point Perspective

Objective:
Student will learn how to make a 2 point perspective cityscape drawing using a varitey of lines to show depth and create details.

Supplies:
Pencil, ruler, eraser, pen, and paper.

Vocabulary:
Horizon line, Vanishing point, Types of Lines (horizontal, vertical, parallel, diagonal, and curved), Hatching, Cross Hatching, Foreground, Middle Ground, Background, Rendering, Source of Light), Depth, and Perspective.

References and Examples:
Perspective Illustrated Examples More examples and how to

Process:
Below is a 4 part visual example.
Part 1: The set up.
Part 2: Creating a shape.
Part 3: Adding additional shapes.
Part 4: Adding details.


Part 1: The set up


Part 2: Creating a shape

Part 3: Adding additional shapes


Part 4: Adding details

Examples of works in progress:


Finished Projects: (coming soon)


Post project essential questions:
What was successful about your project?
What areas did you struggle with?
How much did your peronal experience of living in a city influence the types of buildings you chose to draw?
How do you see a connection betweem Art and Math in this project?

Please answer and e-mail your responses to: bmedina@schutzschool.org.eg

Sunday, September 19, 2010

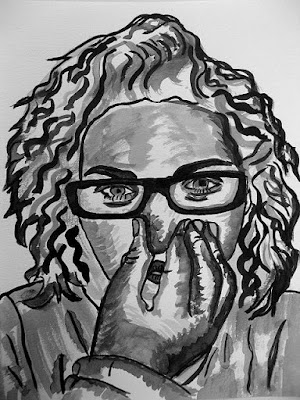
Brush and Ink Portrait

Assignment-Brush and Ink Portrait

Objective:
The students will use ink in working with the principles (unity, contrast, and balance) and elements (line and value) of art to create a portrait.

Supplies: 
Pencil, watercolor paper, India ink, photograph (or Xerox), water, thin round brush

Vocabulary:
Rendering, Value (light, medium, and dark), Line, Unity, Contrast, and Balance.

The Process:
Prior to the student working on the actual project, they will create a value scale of sorts to learn how to make different shades of gray using water and ink.

Step 1: The student will use a photo as a reference to draw (using a pencil) a face on watercolor paper.

Step 2: The student will use a thin round brush and India ink (medium/dark value) to go over the pencil lines.

Step 3: The student will create and use light, medium, and dark ink values (expressed as lines) to render the face.


Final Outcomes:


Post project essential questions:
What was successful about your project?
What areas of your project could you improve in?
What would you have done the same or differently? 
What does a balance of values mean to you now? 

Please answer and e-mail your responses to: bmedina@schutzschool.org.eg

Saturday, September 4, 2010

Stencil Self Portrait

I thought a stencil might be a good project to kick off the year. Typically I start with some a self-portrait project. This year I had my students make a funny and/or outrageous faces when I snapped their photo as a means to demonstrate facial expressions.
Objective:
The students will learn the process of making a 4 color stencil print using shape and value.

Vocabulary:Value (light, medium, and dark), shape, registration, print, base, bleeding, and expression

The Process:
Step 1: Take a photograph of student, print a gray scale version of it, and make 4 copies. The size should be on 8.5" x 11" paper.

Step 2: The student will assign each paper the label of LIGHT, MEDIUM, DARK, or BASE. The student will then determine the appropriate value for each paper then use a marker to trace them out.

Step 3: Once the values have been traced, and approved by the teacher, the student will use an x-acto knife to cut out the shapes.

Step 4: Begin painting! The BASE stencil will be applied first (use either a LIGHT or a MEDIUM color). Apply the LIGHT value next, followed by the MEDIUM, and ending with the DARK. Allow 1-2 minutes for each color to dry between stencils.

I encourage my students to experiment with paint and paper color and alter the order of the stencils. Each student will submit 3 of their best prints.

Online resources: Stencil Archive Banksy Stencil Art